Hyperlinks
The stencil provides the following shapes to add hyperlinks to your maps but any shape can be used for this purpose:
 |
Process Navigator allows you to link to any external file, launch the Internet or another application from a process map. The stencil includes the Activity Hyperlink shape for this purpose, which is sized to fit next to an activity. The icon can be changed (see below). |
 |
Behaves in exactly the same way as Activity Hyperlink but is larger and can be used for a link that applies to the whole process map. The icon can be changed (see below). |
 |
This shape provides a link for map users to email comments about map usability to a specific email address. The address which is used will be specific to your organisation and can be found in your Process Governance Framework. |
Adding a Hyperlink to a Shape
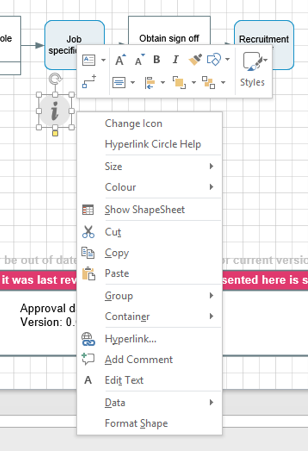
- Right-click on the shape and select Hyperlink from the popup menu or select CTRL+k.
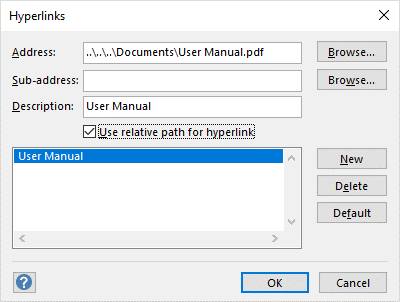
- The following dialog box is displayed:
- For the Address box, click on the Browse button:
- Select Internet Address... and type the URL if you want to launch a file or website from the Internet.
- Select Local File... to browse for the filename and path of the document you want to launch.
NOTE: If the file is in the Documents folder on the Server, then the address should begin \Documents\ followed by the folders and the filename.
If the file is on another server mapped via a drive letter, e.g. S:\HumanResources\Expenses.docx, you will need to replace S:\ with the full name of the server, e.g. \\gsp43\Everyone\ to produce \\gsp43\Everyone\HumanResources\Expenses.docx. - Use the Sub-address box to link to an HTML anchor.
- The Description is set by default to be the filename (the Description is displayed on the Hyperlink’s popup menu). Enter an alternative description in the Description text box if required.
- Select the Use relative path for hyperlink for a local file. Ensure that relative paths will work for your process map when it is published.
- You can add another hyperlink, by clicking New and then repeating the above instructions.
- Click on OK to close the dialog box.


NOTE: If the 'Use relative path for hyperlink' box is ticked and it cannot be un-ticked, it means the process map has not yet been saved. Save the file and you will be able to untick the box.

Having successfully attached the URL or document, you can launch the linked file from your process map by right-clicking on the Hyperlink Circle and selecting the URL or document from the menu.

NOTE: If you need another hyperlink from the same shape, re-open the Hyperlink dialog box, click New and then follow the above steps.
Changing the Icon
You can change the icon using the Shape Data box, but any permitted changes will be described in the Process Governance Framework.
Right-click on the shape and select 'Change Icon'.
- Right-click on the shape and select Change Icon. The Shape Data dialog box is displayed.
- Choose from the available icon types: None, Home, Mail, Forward, Back, Up, Down, Help, Info, Search, Directory, Photo, Text.
- If Text was selected, the value to be displayed can be set in the Custom Text box.
- Use Size to select Small, Medium, Large or use the selection handles to resize the shape.
- The Colour box allows you to select the colour,
- The Define button allows access to all the data for the shape, but should not be used unless permitted in your Process Governance Framework .
- Click on OK.

Hyperlink from other Process Navigator Shapes
You can add hyperlinks to other Process Navigator Shapes such as Activities and Deliverables. This can be done using the Process Navigator dialog boxes or as above.
Using the Visio Method
Select the shape, and follow the actions described above. Once the hyperlink has been inserted, double-click the shape and agree to the Drill-down dialog which will take you to the file.
NOTE: Using this way of hyperlinking does not automatically add a shadow to your shapes. However, you can add a shadow to any shape by selecting the shape, right-click and select Shadow from the menu options. You can remove a shadow by following the same process and deselecting Shadow from the menu option.
TIP: Ensure that you have not already drilled down on the specific shape. If you have, then the hyperlink will not work because the shape is linking to the drill-down page. If you already have a drill down on an Activity shape and need further hyperlinks to documents, you could, for example, drag over an Activity Hyperlink to create the hyperlink.
Opening Hyperlinks in a new browser window
Within the Triaster Platform, hyperlinks from the Activity Hyperlink and Info button do not, by default, open in a new browser window when converted to html. However, you can modify this by following the directions below:
- If the Developer tab is not visible above the Ribbon, right click the Ribbon area and select Customise the Ribbon.... In the list on the right of the dialog box, click in the box next to Developer and click OK. The Developer tab will appear and 'Show ShapeSheet' will appear on the right click menu of all the shapes.
- Select the shape that already has a hyperlink associated with it and select Developer > Show ShapeSheet or right click the shape and select Show ShapeSheet.
- Scroll down to the Hyperlinks section, and in the NewWindow column, select TRUE.
- Close the ShapeSheet.

Please note that if you have multiple hyperlinks, you will need to insert TRUE into the NewWindow column for each hyperlink.
NOTE:Be careful when making changes to the ShapeSheet, as changing other fields inadvertently may cause the process map to become invalid.
To create a Document link on an Activity or Deliverable
- Right click on the Activity or Deliverable and select Properties.
- Select the Navigation tab
- Click on Advanced Options and then Link to document or reusable process. The box Use Relative path should be ticked.
- Click on the ... (Browse) button, change the file type (above the Open button at bottom right) to All Files, navigate to the folder containing the reusable Map you wish to link to, and then select it. Click Open. If you wish the Map to open in a new window or tab, then click the Display in new window box.
- Click OK.

In the map, the Activity or Deliverable will now have a shadow.
Change the order of Hyperlinks
A shape may contain multiple hyperlinks. To specify the order in which these hyperlinks are listed when viewed in Visio:
- If the Developer tab is not visible above the Ribbon, right click the Ribbon area and select Customise the Ribbon.... In the list on the right of the dialog box, click in the box next to Developer and click OK. The Developer tab will appear and 'Show ShapeSheet' will appear on the right click menu of all the shapes.
- Select the shape that already has a hyperlink associated with it and select Developer > Show ShapeSheet or right click the shape and select Show ShapeSheet.
- In the Hyperlinks section, set the SortKey cell for each of the hyperlinks (blank, by default) by numbering appropriately. Close the Shape Sheet.
NOTE:Note: Hyperlinks aren't ordered properly in the HTML output. On a webpage created by Visio, clicking on a shape that has multiple hyperlinks will list the hyperlinks in the order in which they were created.
Link to Pages or Destinations within PDFs
A common method of linking to a particular location within a Microsoft Office document is to link to a bookmark. However, bookmarks aren't recognised in PDFs. The corresponding method for PDFs is to link to a page or a named destination.
Linking to a Page
This is the simpler method because it doesn't require prior preparation of the PDF file to define the target location.
A link to a PDF may be of the form:
http://processlibrary.mydomain.com/documents/MyDocument.pdf
To link to a specific page within that PDF:
http://processlibrary.mydomain.com/documents/MyDocument.pdf#page=4
Linking to Named Destinations
As mentioned, this technique requires editing the PDF document to define a destination. The link to that destination would be of the form:
http://processlibrary.mydomain.com/documents/MyDocument.pdf#nameddest=MyDestination